Installing Apache Tomcat on Google Cloud
Here we will see how to install Apache Tomcat on Google Cloud. In order to install Apache Tomcat on Google Cloud, you need a VM instance. If you don’t have a VM instance then please click on below link for creating a VM instance on Google Cloud.
Creating a VM instance on Google Cloud
Steps to install apache tomcat on google cloud
Assuming you have created a VM instance on Google Cloud.
1)First, Navigate to your VM instance. For navigation, the path is shown below.
Click on Navigation menu -> PRODUCTS -> COMPUTE -> Compute Engine -> VM instances.

2)Click on SSH of respective VM instance which is shown below.

3)Once your SSH terminal is open. Execute the following command to enter in substitute user mode which is shown below.

4)Now Execute the following command to navigate in the root directory which is shown below.

5)Execute the following command to create a tomcat folder which is shown below. If you want to see created folder then execute ls command.

6) In order to run Apache Tomcat, you need a JDK. Execute the following command to install JDK.

7)Execute the following command to navigate in tomcat folder which is shown below.

8)Execute the following command to download Apache Tomcat 8 which is shown below

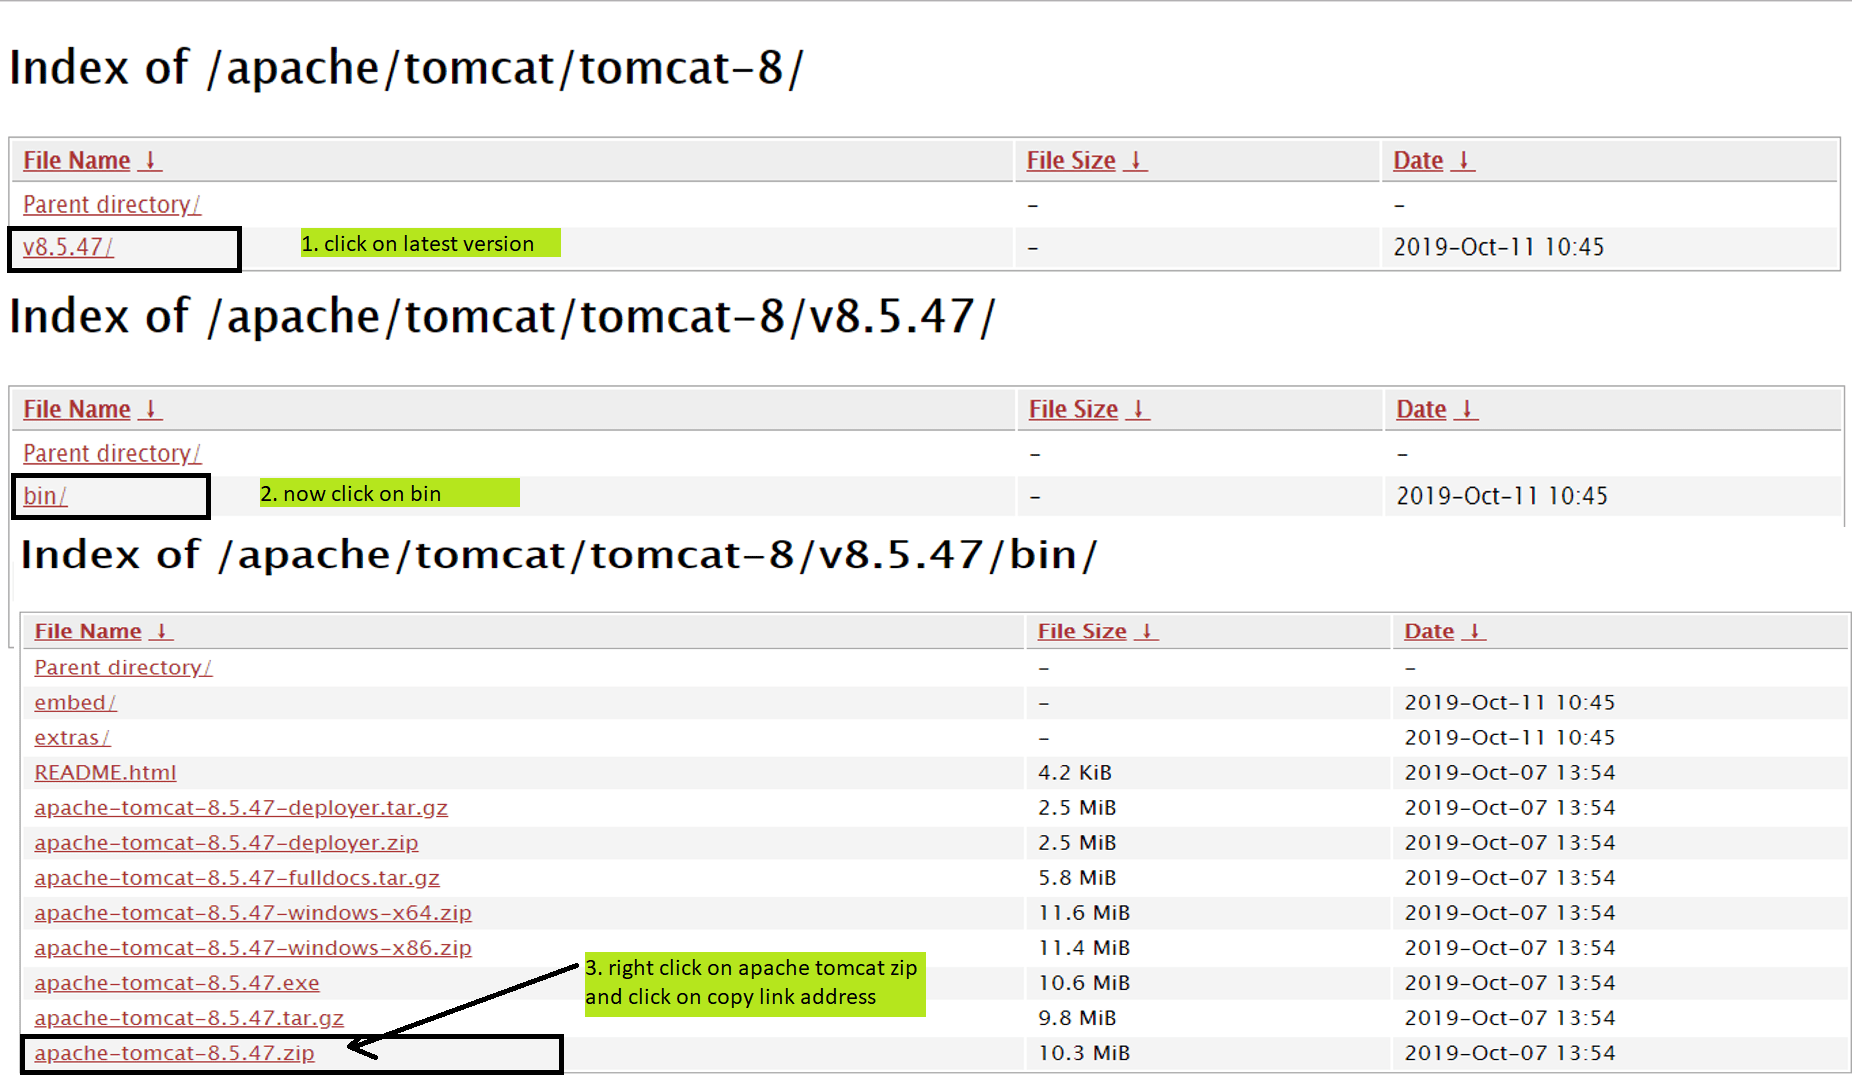
IMPORTANT NOTE: You will get an error 404 not found when apache-tomcat-8.5.47.zip file is not available in above path. If you are getting 404 not found error then only follow this step. Right now available apache-tomcat-8.5.47 version is available in step 8 path. In future apache tomcat version may change. To know available apache tomcat version please open the following URL in any browser and follow following steps show image.
If there is new version then replace copied path and execute the following command.
IMPORTANT NOTE: If there is new version available then please replace version name below in every step.
9)The downloaded file is in zip format. so execute the following command to install unzip which is shown below.

10)Execute the following command to unzip downloaded Apache tomcat 8
11)Execute the following command to check unzip apache tomcat 8. If it showing apache-tomcat-8.5.47 means apache unzip successfully which is shown below.

Steps 12, 13, and 14 are optional. please follow these steps only when you want to modify Apache Tomcat port.
12)Optional step1. If you want to modify apache tomcat port then only follow this step. Execute the following command to navigate in conf folder which is shown below.

13)Optional step2. If you want to modify apache tomcat port then only follow this step. Execute the following command to modify server.xml which is shown below.

14)Optional step3. If you want to modify apache tomcat port then only follow this step. Now only modify port number which is shown below. For example, you want to install apache tomcat on port 80 then modify as port=”80″ and press Ctrl+X and type Y and hit enter

15)Execute the following command to navigate in the bin folder which is shown below.

16)Execute the following command

17)Execute the following command to start the Apache tomcat

18)Now Please open port 8080. If you don’t know how to open port on google cloud please click on the following link.
Opening port on Google Cloud
19)Now go to a browser and enter the following URL to check Apache tomcat is working or not which is shown below. If you are able Apache Tomcat default page means Apache Tomcat installed successfully.
VMExternalIP:8080

20)If you want to stop Apache Tomcat. please execute the following command which is shown below

Common Problems or Mistakes
1)Please perform all steps with substitute user. please don’t forget a step 3
2)Always start and stop tomcat from a bin folder.
3)Don’t forget to open port 8080. If you have modified Apache Tomcat Port then you need to open your modified port.
4)Apache Tomcat default runs on port 8080. please don’t run any other service on Apache Tomcat.
Can I access Apache tomcat only using external IP address without port 8080?
Yes, you can access. In order to do that you just need to install Apache Tomcat on port 80. please follow steps 12-14.
How to host a website on Google Cloud


